OmenMon Graphical Interface (GUI) Mode
- Notification Icon – Tool Tip / Balloon Tip
- Context Menu – Fan / Graphics / Keyboard / Settings
- Main Window
- About Dialog / Error Messages
OmenMon by default starts in graphical mode with a notification icon in the system tray. Command-line mode is also available.
Notification Icon
The application launches in minimized mode with no window being shown. It only places its icon in the notification area:
![]()
![]()
![]()
![]()
The application icon can be static or dynamic, displaying the maximum temperature reading, with the latter optionally also showing a background indicating whether the Performance mode is active. Icon type can be changed through the context menu or directly in the configuration file.
- Left-clicking on the icon shows the main window or hides it if it was being shown already
- Right-clicking on the icon pops up the context menu
Application-created (i.e. non-system) notification icons may end up being hidden by Windows. If that happens, click on the upward arrow to display the overflow menu. You can then drag the icon back to the notification area to keep it visible at all times.
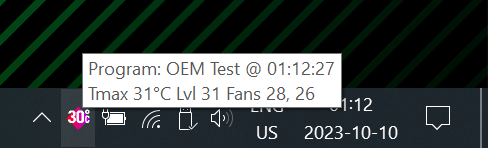
Tool Tip
Hovering the cursor over the icon shows a tool tip.
When a fan program is running, it can be used to check its status:
Balloon Tip
A balloon tip can appear to relay important messages:
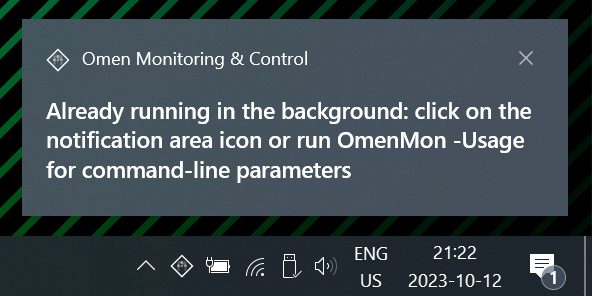
- One situation when this is currently used if the user launches another instance of the application in graphical mode
- Only one application instance is allowed in graphical mode as running multiple would make no sense
- Command-line mode can be used in parallel even the application is already running in graphical mode
- Another situation is when the Omen key is pressed to change fan programs while the main window is hidden, this behavior can be customized with KeyToggleFanProgramSilent
- The functionality to show important status updates, such as possible overheating, is implemented but not currently used
- Balloon tips can be disabled entirely by setting GuiTipDuration to
0
Context Menu
Right-clicking on the notification area icon brings up the context menu.
The top of the context menu shows the following:
- Application name and version – clicking on it brings up the About dialog
- Optional translator credit – only if using a translated version
The menu stays open even when clicked on, to facilitate changing multiple settings in one go. To close the context menu, click anywhere outside of it, for example on the desktop.
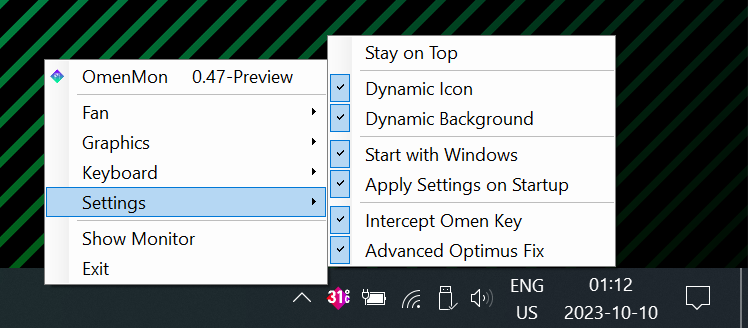
Most of the items are grouped into one of the four submenus: Fan, Graphics, Keyboard and Settings, except the following two on the bottom:
Show Monitor / Hide Monitor
Shows or hides the main window, which is equivalent to clicking on the notification icon. The name of this item changes depending on whether the main window is already being shown or not.
Exit
Closes the application. OmenMon may still start automatically upon logon or respond to the Omen key being pressed, depending on the choices in the Settings submenu. The related settings can also be changed from the command line.
Fan
The items in this submenu control the fans and the thermal platform settings:
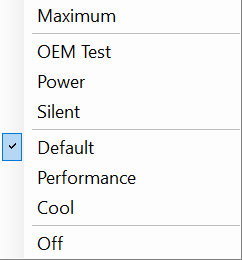
Maximum
Toggles the maximum fan-speed mode on or off. In this mode, each fan operates at around 5,500 revolutions per minute [rpm]. Maximum fan-speed mode is disabled by default.
If this setting is enabled, which is indicated with a check mark next to it, other fan settings are not available. To change the other settings, disable this setting first.
Fan Program List
Runs or terminates a pre-configured fan program. The entries here will differ depending on your settings. The sample configuration file has three programs: OEM Test, Power and Silent.
If a program is active, it is indicated with a check mark, and other fan settings are not available. To change the other settings, first terminate the active fan program by clicking on the check-marked item.
Fan Mode List
Sets the fan performance mode.
Only Thermal Platform Version 1 modes Default, Performance and Cool will be displayed by default, unless a different mode is enabled, in which case it will be shown as well. The remaining choices are Thermal Platform Version 0 legacy modes. You can still see and enable these from the main window.
If a mode is selected here, the application will not take any steps to make sure it persists, which means it will generally revert back to Default in 120 seconds [s] unless Const fan control setting is selected in the main window or the FanCountdownExtendAlways configuration setting is set to true.
Even if this setting is not available, for example when a fan program is active, the current fan mode is shown with a check mark.
Off
Toggles the fans on or off. The fans are on by default. This can be used to switch them off completely. Note that this can lead to the system overheating within seconds if under load.
If this setting is enabled, which is indicated with a check mark next to it, other fan settings are not available. To change the other settings, disable this setting first.
Graphics
The items in this submenu control the graphics adapter and video settings:
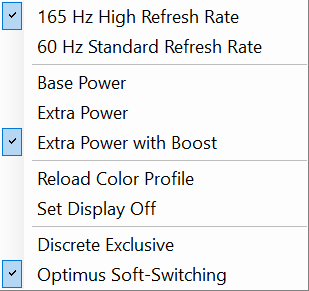
High Refresh Rate / Standard Refresh Rate
This can be used to quickly switch between high and regular screen refresh rates. The predefined rates are controlled by the PresetRefreshRateHigh and PresetRefreshRateLow configuration settings, which you should adjust to match your hardware specifications:
- The high refresh rate is usually 144 or 165 Hertz, and the latter value is the default
- The low (standard) refresh rate is generally 60 Hertz [Hz] and that is the default
If the current refresh rate is any of the two preset rates, a check mark is shown next to it.
Base Power / Extra Power / Extra Power with Boost
These three mutually-exclusive presets control the GPU power level:
- Base Power disables both Custom TGP and PPAB, leaving Base TGP only
- Extra Power enables Custom TGP but keeps PPAB off
- Extra Power with Boost enables both Custom TGP and PPAB
On the author’s system, these correspond to the power levels of 80, 115 and 150 Watt [W] respectively.
A check mark appears next to the active preset. If PPAB is enabled with no Custom TGP, this corresponds to the base setting.
Reload Color Profile
This item lets you reload the default color profile associated with the display. Sometimes the profile is dropped when display settings change or a 3D application is launched. This is a quick workaround for whenever that happens. The same workaround is also a part of the Advanced Optimus Fix.
Set Display Off
Clicking this item will power off the display and switch the keyboard backlight off while the machine remains powered on. This might be useful when running background tasks and keeping the lid up for better thermal performance.
As an exception, the menu will automatically close when you click on this item (since the screen is supposed to go off).
Discrete Exclusive / Optimus Soft-Switching
These two mutually-exclusive settings control the choice of the GPU. Note that this is not the Advanced Optimus switch: Advanced Optimus settings can only be changed from the nVidia Control Panel or the nVidia notification icon if you enabled it.
This is equivalent to changing the pertinent setting in the UEFI Setup but saves you the trip. A reboot is required, and you will be prompted whether you want to proceed with it at once.
Note: This part of the menu is not enabled on models without GPU mode switching support as reported by the BIOS system data. You can still attempt to switch the mode manually from the command line, although it is likely to result in an error. If system data byte #7 bit #3 is set, the Optimus label will switch to 0x02 Optimus mode; otherwise (thus effectively if bit #2 is set, since the menu item would not have been enabled otherwise), the switch will be to 0x00 Hybrid mode. This is to allow for two kinds of devices reusing the same menu.
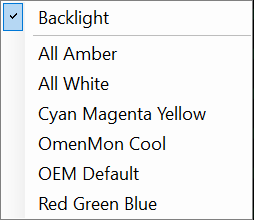
Keyboard
This submenu exposes some of the keyboard settings:
Much more is available through the main window.
Per-key RGB keyboard models are currently not supported and these settings are not enabled for them.
Backlight
Toggles the keyboard backlight on and off. Note that you can still switch presets even if the backlight is off at the moment.
Keyboard Preset List
Loads a pre-configured keyboard backlight color preset. The entries here will differ depending on your settings. Two hard-coded presets appear if none are defined in the configuration file: OmenMon Cool and OEM Default. The sample configuration file has a couple more.
You can save and delete presets using the main window.
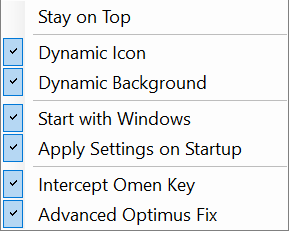
Settings
This submenu exposes some of the application settings:
Much more can be changed in the configuration file.
Changes to these settings take effect immediately, and the configuration file is saved the moment any settings change.
Stay on Top
If enabled, the main window will stay on top of all other windows even if deactivated. This might be useful if you’re for example running a benchmark but still want to monitor the fan and temperature readings.
Otherwise, if this setting is disabled, the window will be moved to the background and possibly become obscured by the active window. This is the default behavior.
This setting defaults to disabled.
Dynamic Icon
If disabled, the icon will be a static picture:
![]()
If enabled, the application icon will report the current highest temperature reading across all monitored sensors:
![]()
How often the value is updated is controlled by the UpdateIconInterval configuration setting.
Enabling the dynamic icon puts an extra workload on the Embedded Controller even when the main window is hidden. This might be worth considering if you are using other applications that also interact with the Embedded Controller.
This setting defaults to disabled however the sample configuration file sets it to enabled.
Dynamic Background
This setting is only applicable if the Dynamic Icon setting is enabled.
If disabled, the icon will have no background.
If enabled, the icon will have a warm background if Performance mode is enabled, or a cool background in any other mode.
![]()
![]()
The hardware seems to have a tendency to drop out of the Performance mode on its own sometimes, so this is a useful thing to check for. However note that if a fan program is running, the specified Performance mode will be maintained automatically, so this is for informational purposes only in such case: you do not need to take any action.
This setting defaults to disabled however the sample configuration file sets it to enabled.
Start with Windows
If enabled, the application will be started whenever a user logs into Windows. This is equivalent to running -Task Gui=On from the command line.
Changing this setting also changes the AutoStartup setting in the configuration file.
This setting defaults to disabled however the sample configuration file sets it to enabled.
Apply Settings on Startup
If enabled, the application will upon startup apply the default graphics power preset and fan program as outlined in the documentation for the AutoConfig configuration setting.
The Gui task state will also be synchronized to the value of the AutoStartup setting.
Note that to fully take advantage of this setting, the configuration file has to be edited manually.
This setting defaults to disabled however the sample configuration file sets it to enabled.
Advanced Optimus Fix
This setting attempts to work-around some issues related to the nVidia Advanced Optimus functionality. It is equivalent to enabling the Mux task, that is running -Task Mux=On from the command line.
If enabled, whenever the nVidia Advanced Optimus switches the GPU, if it is the discrete GPU that is being enabled and this occurs the first time following a reboot, the application will:
- Reapply the color profile – to workaround the bug where the color profile is not being applied
- Restart the Windows Explorer shell – to workaround the bug where the screen starts to stutter
- Restart the nVidia Display Container service – to restore any nVidia notification-area icons, which no longer appear following the Explorer shell restart
There is no corresponding configuration option for this setting. It is disabled by default.
Intercept Omen Key
This setting controls whether the application responds to the Omen key. It is equivalent to enabling the Key task, that is running -Task Key=On from the command line.
The application’s response to the Omen key can be further controlled with the KeyCustomAction and KeyToggleFanProgram configuration settings. Briefly, subsequent key presses can either toggle the main window, first bring up the main window and then toggle the fan program, or the key can be used to launch another application with arbitrary arguments.
Note that to fully take advantage of this setting, the configuration file has to be edited manually.
There is no corresponding configuration option for this setting. It is disabled by default.
Main Window
The main window can be brought up by either clicking on the notification icon, choosing the Show Panel item from the context menu, or by pressing the Omen key – if the Intercept Omen Key setting is enabled and KeyCustomAction is disabled.
The window dimensions cannot be adjusted, and the window itself cannot be minimized: it can only be shown or hidden.
- Clicking the
?button brings up the About dialog - Clicking the
×button or pressing Alt-F4 hides the window from view- If GuiCloseWindowExit is set to true, it closes the application entirely instead
The window can also be hidden by clicking on the notification icon when it is being shown, or by choosing the Hide Panel item from the context menu.
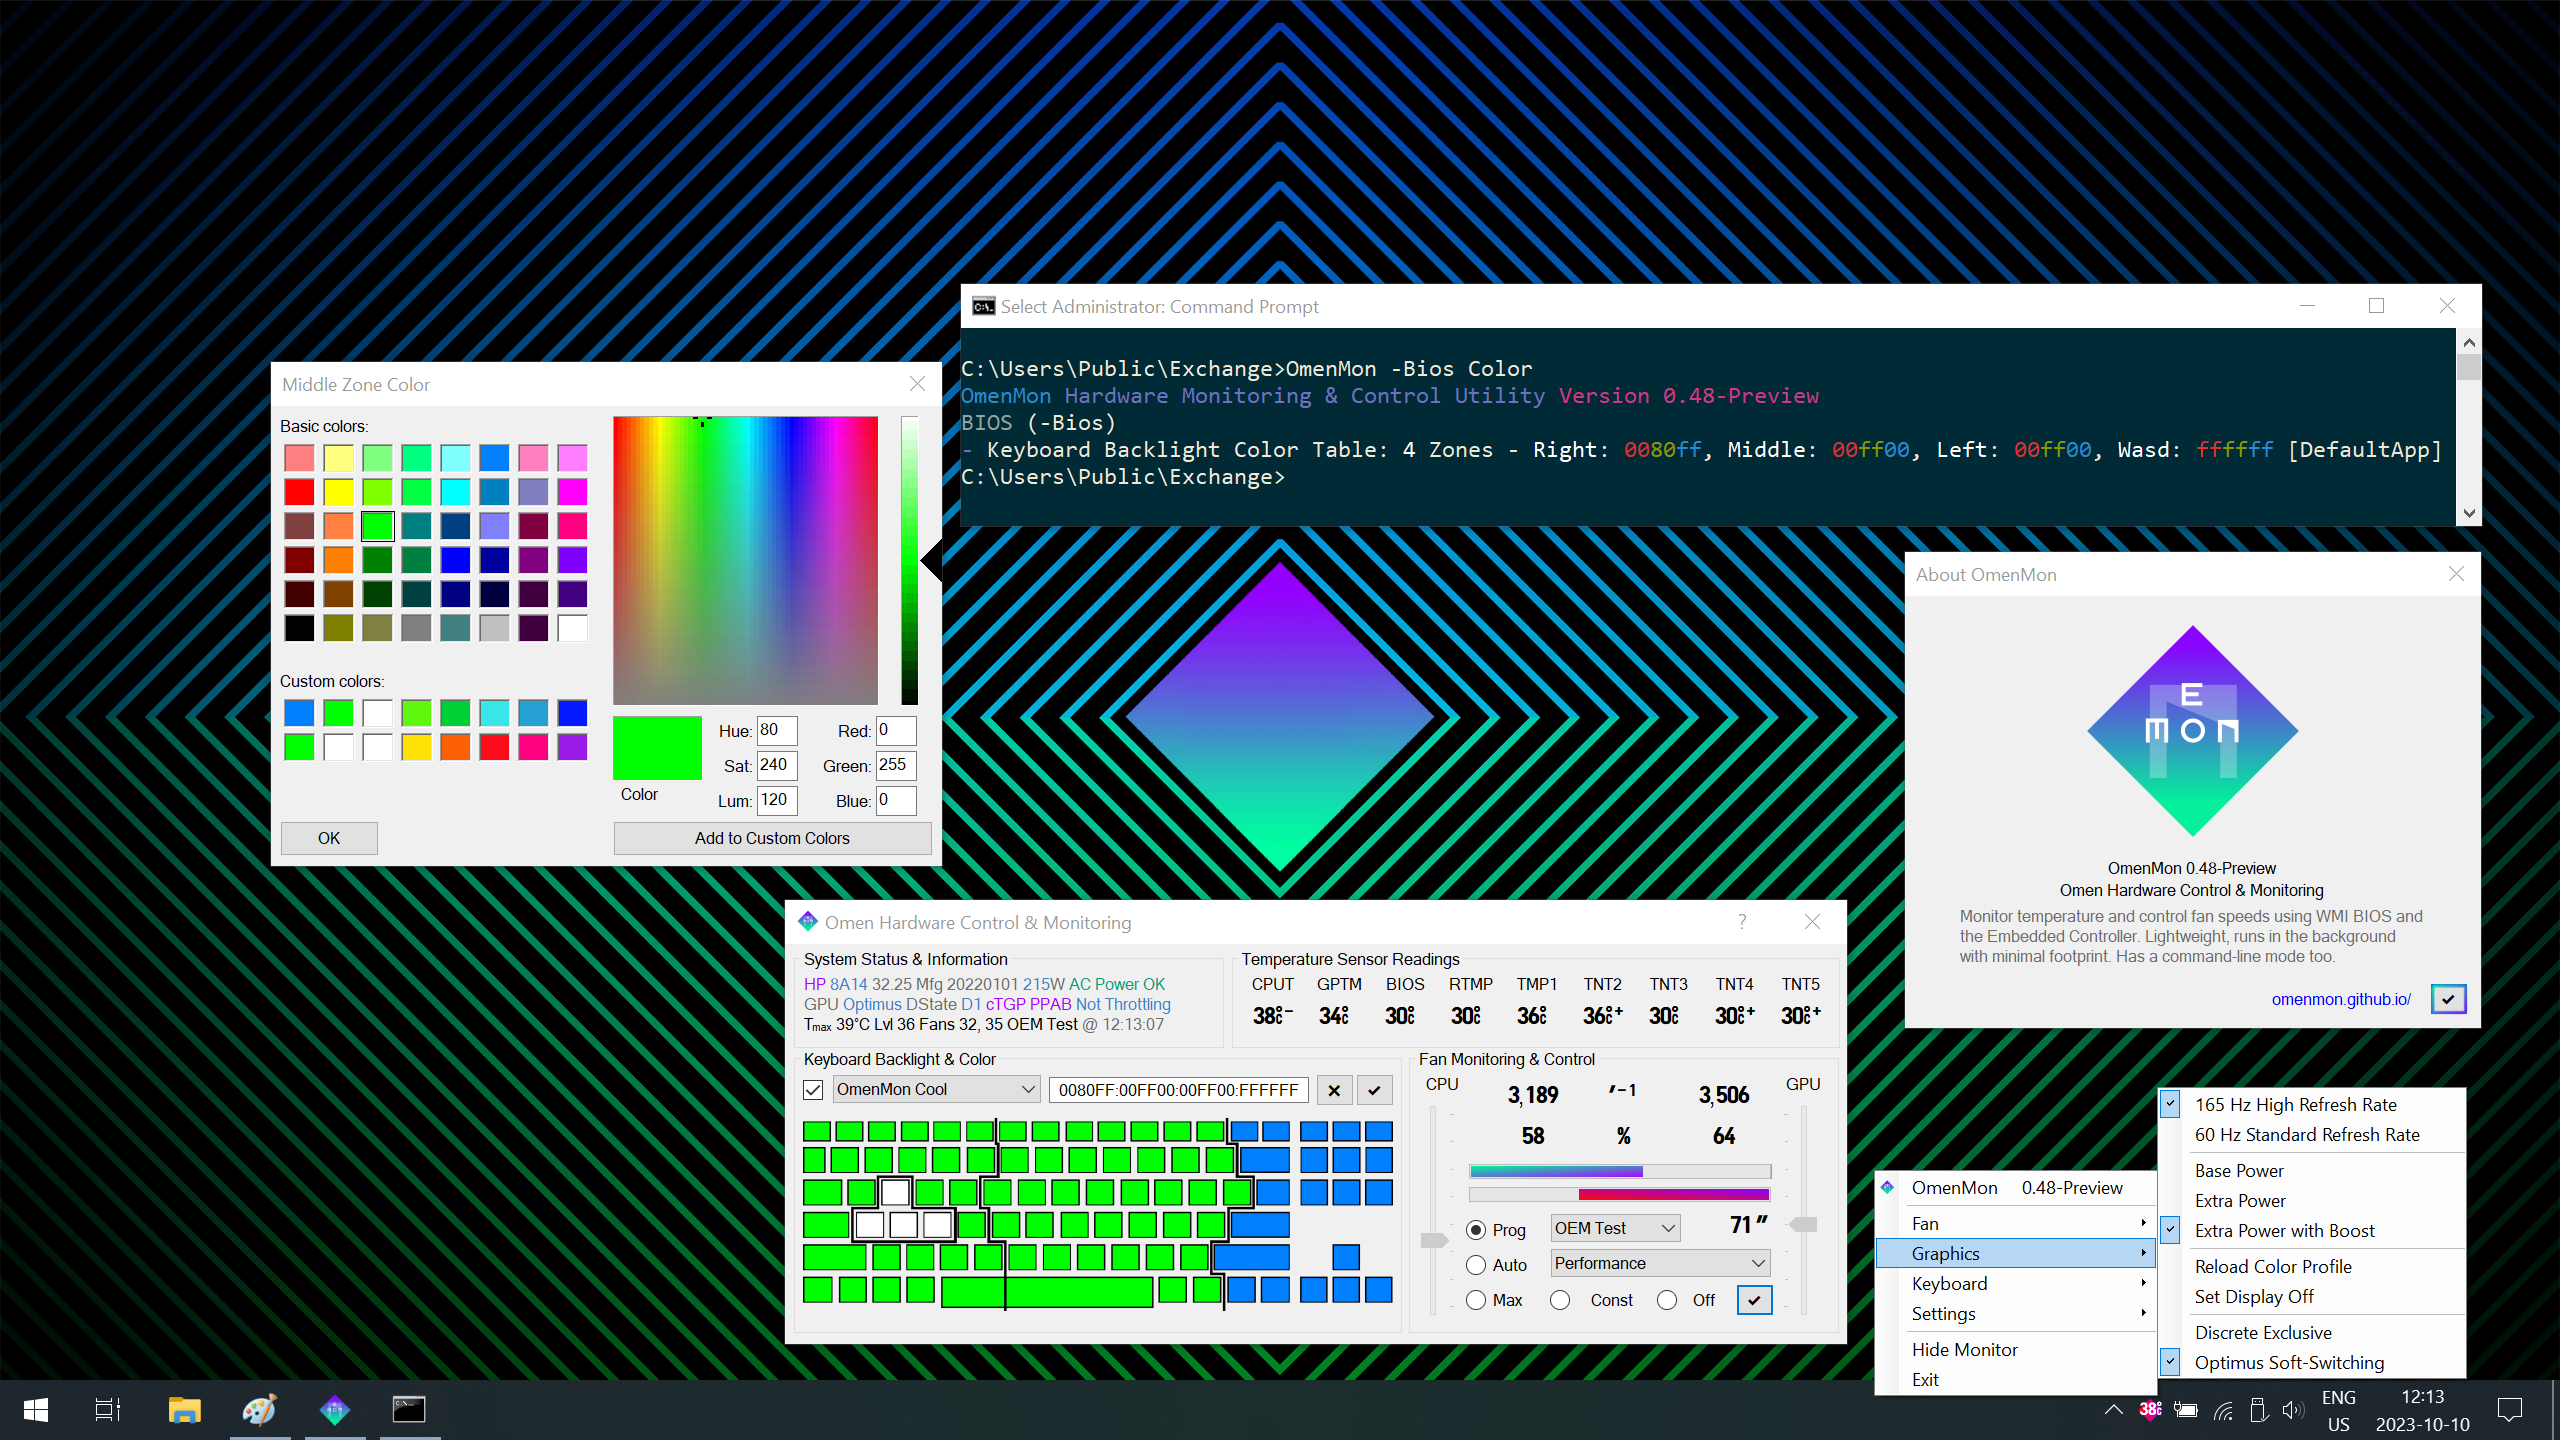
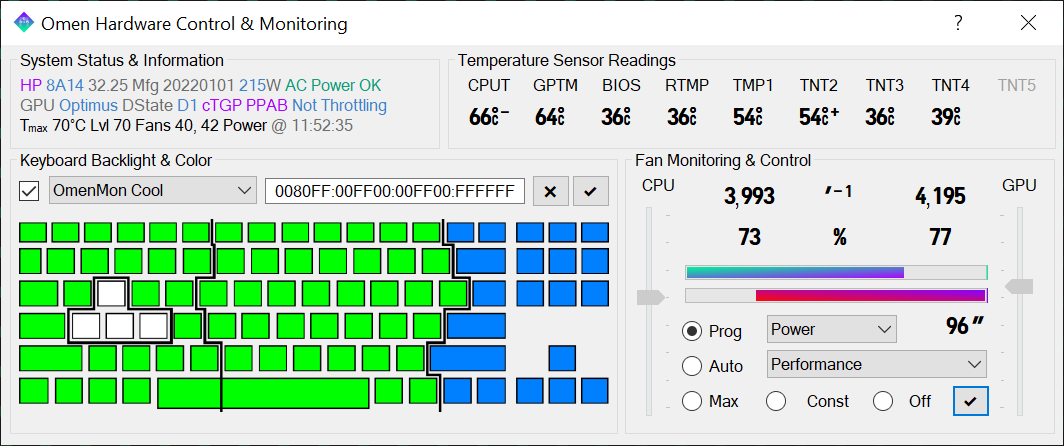
The items in the main window are organized into the following groups: Keyboard Backlight & Color, Temperature Sensor Readings, Fan Monitoring & Control, and System Status & Information.
Keyboard Backlight & Color
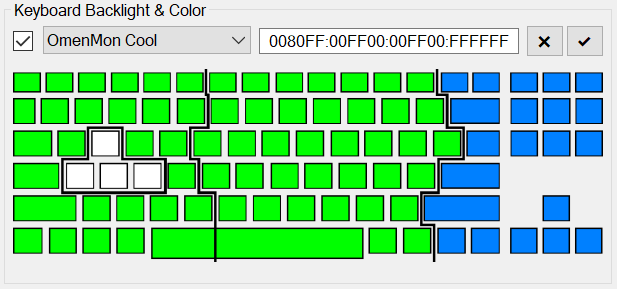
- Use the checkbox to toggle keyboard backlight on and off
- If the backlight is off, no changes can be made to the keyboard settings here
- However, presets can still be loaded from the context menu and changes can be made from the command line
- The picture shows the current backlight colors for each of the four zones
- Click on a zone to bring up the Color dialog for the given zone
Color Dialog
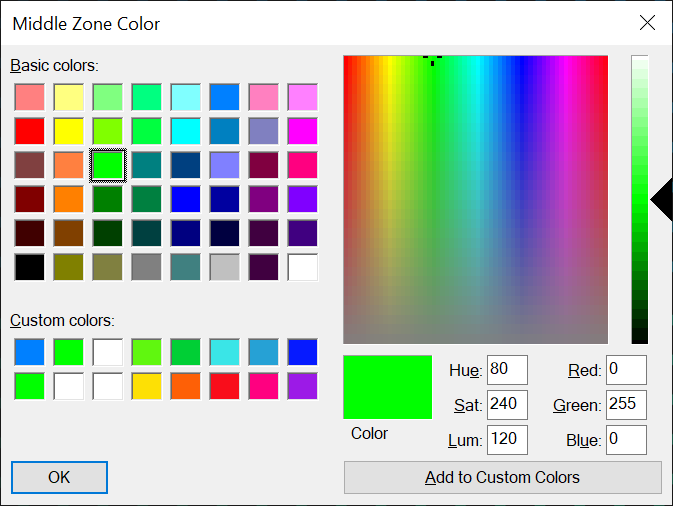
- The window title tells you the zone the color of which is being changed
- Choose a color from the list or using the picker: changes are applied in real time
- Take note of the custom colors:
- The leftmost four are the current backlight colors
- The rightmost ten are vivid colors verified to look good with the LEDs (not all colors do)
- The middle two slots are for your own use: they are retained for as long as the main window stays open
- Click OK or press Enter to dismiss the dialog at any time
Color Parameter
- Instantly set the four zones to any color combination by typing the parameter
- The format follows the same syntax as when changing colors from the command line
- Whenever you change the colors using the Color dialog, the parameter value is updated automatically
Color Preset List
Pick a preset from the drop-down list to immediately apply it
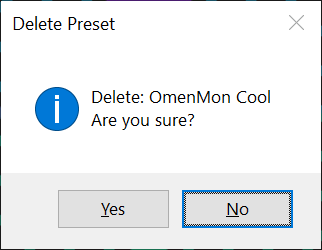
Delete Preset
Press the × button to delete a preset.
A confirmation is required:
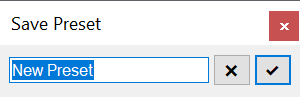
Save a Preset
Press the ✓ button to save a preset.
- Name the new preset
- Press
✓again to confirm - Or, press
×if you changed your mind
Temperature Sensor Readings

This portion of the main window shows temperature sensor readings.
- Up to 9 sensors are available, which includes:
- 8 Embedded Controller sensors labeled
CPUT,GPTM,RTMP,TMP1,TNT2-TNT5 - 1 BIOS sensor labeled
BIOS
- 8 Embedded Controller sensors labeled
- Not all sensors are active all the time
- For example the
GPTMsensor is only active when the discrete GPU is in use
- For example the
- Hover the mouse over the particular sensor to see its description
- A superscript + or - next to a sensor indicates an ascending or descending trend
- The temperature is shown in degrees Celsius [°C]
- Readings are updated every UpdateMonitorInterval seconds [s]
- Sensors can be customized and set to only be shown but not used for determining the maximum temperature: in such case, the name is
struck-through
Fan Monitoring
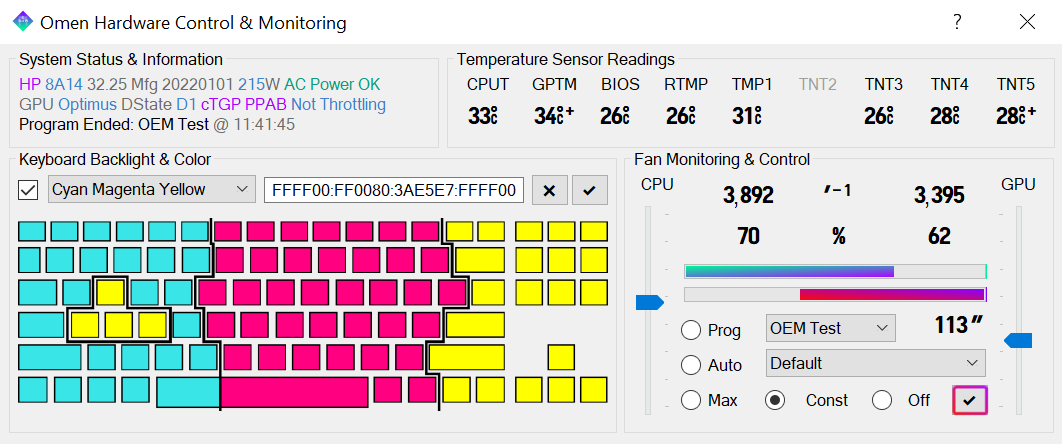
Within the Fan Monitoring & Control group:
- The left-hand side shows the CPU fan data
- The right-hand side shows the GPU fan data
For each fan, the following are shown:
- Current fan speed in revolutions per minute [rpm] = [1/min] = [min⁻¹] = [′⁻¹]
- Relative fan rate as a ratio of the maximum speed in percent [%]
Additionally, the relative fan rate is shown on a bar for each fan:
- The cool bar, moving left to right, refers to the CPU fan
- The warm bar, moving right to left, refers to the GPU fan
Vertical trackbars on each side automatically move as the fan speed levels change – unless Const mode is selected, in which case they wait to be moved by the user in order to select the desired speed level for each fan.
If applicable, a value beneath the bars on the right-hand side indicates the remaining time until the fan mode reverts back to the default settings. This is indicated in seconds [s] = [″].
Fan readings are updated every UpdateMonitorInterval seconds [s].
Fan Control
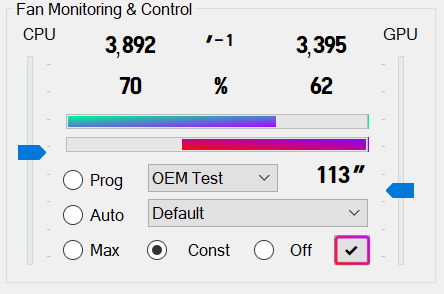
Fans can be controlled with the radio buttons, of which there are five – each indicating a different control mode:
- Prog to use a fan program selected from the drop-down list
- Auto to use the automatic defaults with a mode picked from the drop-down list
- Const to hold the fans at a constant speed
- Max to set the fans to maximum speed
- Off to switch the fans off entirely
A border around the ✓ button indicates the selected settings have changed and are different from those currently active. Click the button to apply them.
The settings are applied only when the ✓ button is pressed. It can still be pressed even if the settings are unchanged, as it might sometimes be useful to reapply the same settings.
Automatic Fan Mode
- The drop-down list by default shows the currently-active mode
- Modes other than the Default can be selected from the drop-down list
- Unlike in the context menu, legacy modes can be selected here as well
- If you want a mode other than Default to persist, select Const afterwards
- Otherwise, the mode will revert to Default when the timer runs out
- Do not press the
✓button after selecting Const as this would switch to the Const mode - Alternatively, you can set FanCountdownExtendAlways to true
Constant-Speed Fan Mode
When the Const option is selected, the following changes, regardless of whether the ✓ button was pressed:
- The vertical trackbars on each side, which normally cannot be dragged by the user but keep adjusting automatically to indicate the current fan speed level, stop moving and become accessible – the gray color changes to blue
- The timer will not be allowed to run out, which means any custom settings will persist for as long as the application keeps running and the window is not hidden – for details on how this is implemented, see FanCountdownExtendThreshold
When using the trackbars for setting the custom fan speed, keep in mind the following:
- The lowest position corresponds to level 20 and the highest – to level 55, that is 2,000 and 5,500 rpm respectively
- These can be adjusted with FanLevelMax and FanLevelMin
- If the lowest position is selected, it is interpreted as a 0
- However, the hardware constraint is that at least one fan must be running at any given time, so if you set both trackbars to their lowest setting, the Off setting will be used instead to keep fans disabled. Note that the implications of keeping both fans off for extended periods of time have not been extensively evaluated.
Remember to press the ✓ button to apply the settings afterwards.
Fan Program
Pick a custom pre-defined fan program from the drop-down list and press the ✓ button to run it.
The program will continue running for as long as the application is open. You can monitor the program status in the System Status & Information area if the main window is being shown, as well as in the notification icon tool tip.
Switching to any other control mode and applying the settings will also automatically terminate the fan program. However, making any changes to the fan settings from the command line does not take into account whether a fan program is running. In fact it is possible to run a fan program from the command line in parallel as well. The responsibility not to run more than a single fan program at any given time is with the user.
For more details regarding this functionality and how to configure it, see Fan Programs, FanCountdownExtendThreshold, UpdateProgramInterval.
System Status & Information
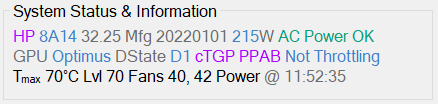
This portion of the window consists of a text field with three rows. These begin with the system data as reported by WMI, which might be useful for issue tracking, as well as to differentiate platform-specific settings in the future:
- HP – Manufacturer
- 8A14 – Product Identifier
- 32.25 – Product Version (Embedded Controller Firmware Version)
- * 20220101 – Born-on Date
The next couple of values might come handy for performance evaluation. In particular, AC adapter issues, if present, may be preventing the hardware from operating at full speed:
- 215W – Default Power Limit 4
- AC Power OK – Smart AC Adapter Status or No AC Power – if on battery
The following row focuses on the GPU:
- GPU Optimus – GPU Mode
- DState D1 cTGP PPAB – GPU Power
- If disabled, these show as
cTGPPPAB(struck-through) and in gray
- If disabled, these show as
- Not Throttling – Throttling Status
Much more of the status information can be retrieved by running -Bios from the command-line mode.
The bottom row is primarily used for fan-program status reporting. In the example:
- Tmax 70°C is the highest temperature reading across all the sensors
- Lvl 70 is the selected program temperature level – the highest entry lower or equal than the temperature reading [°C]
- Fans 40, 42 are the fan levels corresponding to the temperature level – the fans have been set to these speeds [krpm]
- Power is the name of the currently-running fan program, prefixed with [Alt] if enabled automatically as an alternative due to AC power loss
- @ 11:52:35 is the timestamp when the fan program was last updated
Even if the main window is hidden, the same information can be obtained from the notification icon tool tip.
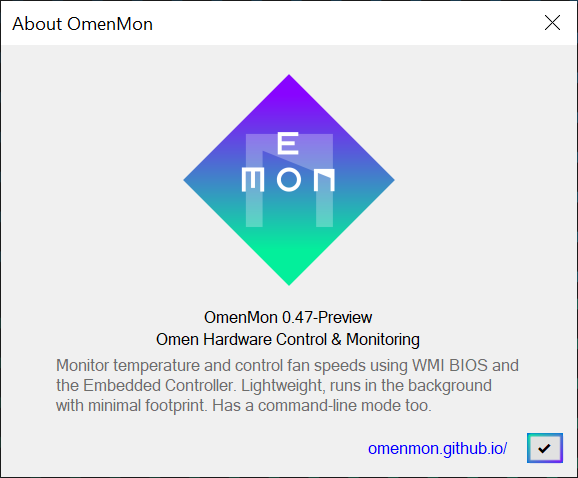
About Dialog
An About dialog is available by either clicking on the question-mark icon in the main window title bar or the application name in the context menu. The dialog shows the application version alongside a brief description and a link to the project homepage:
Error Messages
The About dialog is repurposed for displaying error messages.
As an example, using OmenMon in graphical interface mode requires compatible HP Omen hardware. An error message is produced upon startup otherwise:
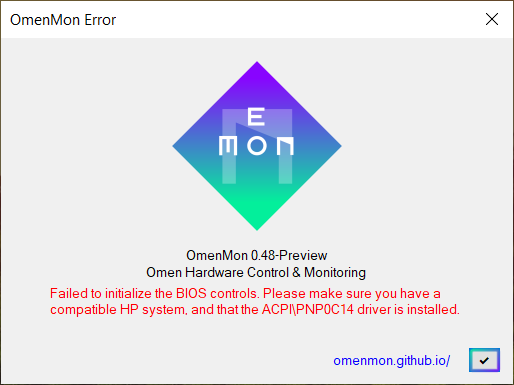
Unhandled exceptions will still be shown with the default prompt to facilitate bug fixes.
Note that although the graphical mode cannot be launched without the compatible HP Omen WMI BIOS interface, where possible, some of the application functionality, such as the Embedded Controller command-line operations, should still be available for use with non-HP Omen hardware.